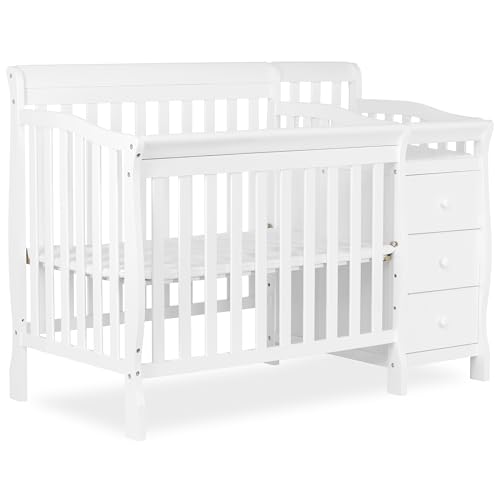
Crib With Changing Table On Left Side: The Complete Buyer's Guide
Everything you need to know about left-side changing table cribs — layout advantages, safety considerations, storage options, and how to pick the right configuration for your nursery workflow.
Why this guide matters: If you've already decided on a crib with an attached changing table, the next question is orientation. A left-side configuration changes how you move through your nursery, where you store diapering supplies, and how the room flows around doorways and windows. This guide breaks down what to check before you commit, so you can choose with confidence.
What "Changing Table On Left Side" Actually Means
A crib with changing table combines two core nursery functions into a single furniture footprint. When the changer is positioned on the left side of the crib, it means that — as you face the front of the crib — the changing surface sits to your left. This is a fixed orientation: the manufacturer builds the changer into the left panel, so it cannot be flipped after assembly.
This matters because orientation is one of the few things you cannot adjust later. If your nursery door opens on the right, or your only free wall sits to the right of the crib, a left-side changer may put the diapering station in an awkward spot. Conversely, if your room layout naturally places the crib with its left panel facing open floor space, a left-side model is the smoother choice.
Layout Advantages of a Left-Side Changing Station
Orientation isn't cosmetic — it directly affects how efficiently you handle nighttime changes and how safely you move around the crib. Here are the practical benefits parents commonly report with a left-side changer:
- Natural reach for right-handed caregivers: When you stand at the left side of the crib facing the changing surface, your dominant hand is closest to wipes, creams, and fresh diapers stored on the changer's shelf or adjacent unit.
- Keeps the crib rail unobstructed: With the changer on the left, the front rail and the right side remain clear, so lifting baby in and out of the crib doesn't require reaching over a changing surface.
- Better doorway flow: If your nursery door is on the right wall as you enter, a left-side changer keeps the diapering zone out of the main traffic path, reducing bumping and clutter near the entrance.
- Pairs well with left-wall windows: A changer on the left can sit beneath a window without blocking the crib's long side, provided you follow window-safety guidelines (no cords, secure blind hardware).
If your room is tight, orientation becomes even more important. Our guide to compact baby gear covers how to evaluate footprint before you commit to any combination unit.
Safety Checks Before You Buy
Combination furniture is convenient but demands the same scrutiny as standalone pieces. Run through this checklist before purchasing any left-side changer crib:
- Changer surface depth and restraint: Look for a changing surface with raised edges on all four sides and a safety strap. Confirm the manufacturer states a weight limit for the changer that matches your baby's growth curve through the diapering stage.
- Stability of the combined unit: A crib with an attached changer has an asymmetric load. Check that the base is wide enough and that the changer is mechanically fastened — not just resting on a shelf — so the unit cannot tip when baby shifts.
- Fall hazard awareness: Never leave a baby unattended on an elevated changing surface, even with a strap. Keep one hand on baby at all times, and stage supplies within arm's reach before you begin.
- Assembly and anchoring: Follow the manual exactly. If the unit includes an anti-tip kit or wall-anchor hardware, install it. Left-side changers put more weight on one side, so anchoring matters more, not less.
- Conversion path: Confirm the crib converts to a toddler bed or daybed and that the changer is removable. A removable changer lets you repurpose the crib as your child grows — see our convertible crib guide for what to look for in conversion hardware.
Left-Side vs. Right-Side vs. Detached Changing Table
Orientation is a real decision, but it's not the only one. Here's how the three common configurations compare on the factors that matter most:
| Configuration | Best For | Trade-Offs | Storage Profile |
|---|---|---|---|
| Left-side attached changer | Nurseries with open floor to the left of the crib; right-handed caregivers | Orientation is fixed at purchase; unit is heavier | Integrated shelves or drawers on the changer |
| Right-side attached changer | Nurseries with open floor to the right; doorways on the left wall | Same fixed-orientation constraint, mirrored | Integrated shelves or drawers on the changer |
| Detached changing table or pad | Rooms where you want to reposition the diapering zone later | Requires separate floor space; two pieces to anchor | Depends on the standalone unit |
If you want the flexibility to move the diapering zone, consider a standalone unit paired with a contoured changing table pad on a dresser top — many parents find this arrangement easier to adapt as the nursery evolves. Combination units, by contrast, are a long-term commitment to one layout.
Storage and Organization Around a Left-Side Changer
The changer's position on the left changes where your supplies should live. A practical setup:
- Immediate reach zone (left hand): Wipes, diaper cream, and a small stack of diapers on the changer's built-in shelf or a wall-mounted caddy directly above the changing surface.
- Secondary zone (below the changer): Bulk diaper packs, backup wipes, and a changing pad cover in the unit's lower shelf or drawer.
- Crib-side zone (right hand): Keep this area clear for lifting baby. A small nightstand on the right side can hold a burp cloth and a spare sleep sack without crowding the crib rail.
If your nursery is short on floor space, review our ideas for creative storage solutions that adapt to small rooms — the same principles apply to nursery organization.
Who Should Choose a Left-Side Configuration
A left-side changer is a strong fit if you recognize yourself in these scenarios:
- Your room's open space is on the left. This is the single strongest signal. Orientation should follow the room, not the other way around.
- You're right-handed and want one-handed access to supplies. Standing at the changer with your dominant hand free reduces fumbling during night changes.
- Your crib sits against a right-hand wall with the door on the right. A left-side changer keeps the diapering zone away from the entry path.
- You plan to convert the crib later. Many combination units let you remove the changer and use the crib as a toddler bed — see our notes on convertible crib and changing table sets for conversion-friendly models.
If none of these apply, a right-side model or a detached setup may serve you better. There's no universally "correct" orientation — only the one that matches your room and your routine.
Final Buying Checklist
Before you finalize a purchase, confirm each of the following:
- Measured the crib's full footprint including the changer extension against your nursery floor plan
- Verified the changer sits on the side where your room has open floor space
- Confirmed the changing surface has raised edges and a safety strap
- Checked that the changer is mechanically fastened and the unit includes tip-over anchoring
- Read the assembly manual for conversion steps and changer removal
- Verified current safety standard compliance and recall status for the specific model
- Planned supply storage in the immediate-reach zone before baby arrives
Frequently Asked Questions
Can I flip a left-side changing table to the right side after assembly?
Generally no. On most combination cribs, the changer is built into a specific side panel and cannot be relocated without disassembling the unit — and in many cases the hardware is not designed to be reversed. Treat orientation as fixed at purchase.
Is a crib with an attached changer safe for newborns?
Yes, provided you follow the manufacturer's instructions, secure the unit with tip-over anchoring, never leave a baby unattended on the changing surface, and confirm the model meets current safety standards. The crib portion should be used with a firm, properly fitted mattress only.
How much clearance do I need on the changing side?
Plan for at least 24 inches of open floor in front of the changing surface so you can stand comfortably and turn without bumping the crib. More clearance is better if you'll be carrying baby to and from the changer at night.
Can I remove the changing table later?
On many convertible models, yes — the changer detaches so the crib can serve as a toddler bed or daybed. Confirm removal steps in the manual before buying, since not all units are designed for it.
What if my room's open space is on the right?
Choose a right-side configuration or a detached changing table instead. Forcing a left-side unit into a right-side room creates an awkward workflow and may push the diapering zone into a doorway or walkway.